Pages

Gin Rummy Indian Rummy Nine Men's Morris and more Air Attack

Wednesday 20 January 2016

Downloading asset bundles and loading scene from it with Unity 5.x


In this post we will create an asset bundle with simple scene and then we will load this from a different scene.

Creating the Asset Bundle

Let myscene be the name of the scene which we want to put in to an asset bundle. To create an asset bundle click on to the scene and  at the bottom of your inspector window give a name for your AssetBundle.


We will need a script to export our scene as an asset bundle. Use the following editor script code export the asset bundles.
using UnityEditor;

public class CreateAsset
{
    [MenuItem ("Assets/Build AssetBundles")]
    static void BuildAllAssetBundles ()
    {
        // Assets/AssetBundles is the out put path
        BuildPipeline.BuildAssetBundles ("Assets/AssetBundles");
    }
}

This script requires the folder Assets/AssetBundles to be present. As you might have guessed, this script should be kept in Assets/Editor folder.

Now create the asset bundle using the menu item Assets->Build AssetBundles

Please see http://docs.unity3d.com/Manual/BuildingAssetBundles.html for more information on creating asset bundles.

Downloading the asset bundle

Use the following code snippet to download the asset bundle and then to load the scene from it
string ASSET_URL = "your asset url";

var download = WWW.LoadFromCacheOrDownload(ASSET_URL, 0);

yield return download;

if (download.error != null) {
     Debug.LogError("Error in downloading the asset bundles : " + download.error); 
    yield break;
}

AssetBundle bundle = download.assetBundle;
bundle.LoadAllAssets();

Application.LoadLevel ("myscene");

Saturday 9 January 2016

Lambda support in Android with retro lambda

Software

Java 8

Java 8 is required for retro lambda to work. This is required since retro lambda transforming Java 8 compiled byte-code so that it can run on an older Java run-time.

Setup

Environment Variables

Set environment variable JAVA8_HOME to point to the Java 8 installation directory. Please make sure that $JAVA8_HOME/bin/javac is valid.
You can keep JAVA_HOME to point to your java SDK which is used to build the Android application.

Gradle Build

Add the following dependency in to your main build.gradle, its ok to add it to your apps build.gradle as well.
buildscript {
    repositories {
        mavenCentral()
    }

    dependencies {
        classpath 'me.tatarka:gradle-retrolambda:3.2.0'
    }
}

Add retro lambda plugin to your apps build.gradle as,
apply plugin: 'me.tatarka.retrolambda'

That's it, now you should be able to use lambda expression in your projects. That means now you should be able to set a View click listener as,
findViewById(R.id.changeColorButton).
    setOnClickListener((v) -> v.getRootView().setBackgroundColor(mColors[mRandom.nextInt(mColors.length)]));

For a simple example, please see https://github.com/trsquarelab/androidexamples/tree/master/HelloRetroLambda


Friday 8 January 2016

Java code formatting hook for git

Code formatting will be done using pre-commit hook, which runs first when user do a commit.

Code for the hook is given below. It formats java source code using astyle.
#!/bin/bash

# don't do anything if astyle command is not available
command -v astyle >/dev/null 2>&1 || { exit 0; }

# get the root directory for the repository
RootDir=`git rev-parse --show-toplevel`

# get all the files that are staged
for v in `git diff --name-only --cached`
do
    # if it is java file
    if [[ $v == *.java ]]
    then
        astyle --style=java "$RootDir/$v" > /dev/null 2>&1
        # remove the .orig file created by astyle
        [ -f "$RootDir/$v"".orig" ] && rm -f "$RootDir/$v"".orig"

        # stage the modified file
        # its ok if the file is unchanged after running astyle
        git add "$RootDir/$v"
    fi

done

exit 0
Copy the above code in .git/hooks with file name as pre-commit.

For this hook to work as expected astyle command needs to be in the path. Astyle can be downloaded from http://astyle.sourceforge.net/

For more information on git hooks please visit https://git-scm.com/book/en/v2/Customizing-Git-Git-Hooks

Tuesday 5 January 2016

Data binding in Android RecyclerView

It is recommended that you go through the post Data binding in Android ListView before reading this one.

Build Setup

Enable data binding in the build.gradle of your app, code snippet is shown below,
dataBinding {
    enabled = true
}

For more information on how to set-up your project with data binding please visit http://developer.android.com/tools/data-binding/guide.html

In this post we will have an application with a list of an ImageView and a TextView in each row. Very similar to that of Data binding in Android ListView

Model

Our model class used for individual rows of the list will have an integer member to store the image resource and a string member.
package com.example.databindingrecyclerview;

public class AndroidInfo {
    public int iconResource; /* Resource id for the image */
    public String name;      /* Name */

    public AndroidInfo(int r, String n) {
        iconResource = r;
        name = n;
    }
}

For the entire list we will have another class which stores a list of the above class.
package com.example.databindingrecyclerview;

import android.databinding.ObservableArrayList;
import android.view.View;

public class AndroidInfoList {
    public ObservableArrayList<AndroidInfo> list = new ObservableArrayList<>();
    private int mTotalCount;

    public AndroidInfoList() {
        for (mTotalCount =1; mTotalCount <11; ++mTotalCount) {
            add(new AndroidInfo(android.R.drawable.sym_def_app_icon, "icon_" + (mTotalCount)));
        }
    }

    // Called on add button click
    public void add(View v) {
        list.add(new AndroidInfo(android.R.drawable.sym_def_app_icon, "icon_" + mTotalCount++));
    }

    // Called on remove button click
    public void remove(View v) {
        if (!list.isEmpty()) {
            list.remove(0);
        }
    }

    private void add(AndroidInfo info) {
        list.add(info);
    }
}

Layout

We will have two layout files,  one for the list item and the other the main layout file.
Layout file for the list items is shown below,
<?xml version="1.0" encoding="utf-8"?>

<layout
    xmlns:android="http://schemas.android.com/apk/res/android"
    xmlns:bind="http://schemas.android.com/apk/res-auto">
    <data>
        <variable name="info" type="com.example.databindingrecyclerview.AndroidInfo"/>
    </data>

    <LinearLayout
        android:orientation="horizontal"
        android:layout_width="match_parent"
        android:layout_height="wrap_content"
        android:weightSum="2">
        <ImageView
            android:layout_width="match_parent"
            android:layout_height="wrap_content"
            android:layout_weight="1"
            bind:imageRes="@{info.iconResource}"/>

        <TextView
            android:layout_width="match_parent"
            android:layout_height="wrap_content"
            android:layout_weight="1"
            android:text="@{info.name}"/>
    </LinearLayout>

</layout>

Attribute bind:imageRes will be used to set the image for ImageView from resource id.
Implementation of which is shown below,
    @BindingAdapter("bind:imageRes")
    public  static void bindImage(ImageView view, int r) {
        view.setImageResource(r);
    }

Main Layout file

Our main layout file is shown below,
<?xml version="1.0" encoding="utf-8"?>
<layout
    xmlns:android="http://schemas.android.com/apk/res/android"
    xmlns:bind="http://schemas.android.com/apk/res-auto">
    <data>
        <variable name="heading" type="com.example.databindingrecyclerview.ListHeading"/>
        <variable name="infos" type="com.example.databindingrecyclerview.AndroidInfoList"/>
    </data>

    <LinearLayout
        android:layout_width="match_parent"
        android:layout_height="match_parent"
        android:orientation="vertical"
        android:weightSum="10">

        <LinearLayout
            android:id="@+id/opLayout"
            android:layout_width="match_parent"
            android:layout_height="wrap_content"
            android:orientation="horizontal">
            <Button
                android:id="@+id/addItem"
                android:layout_width="match_parent"
                android:layout_height="wrap_content"
                android:layout_weight="1"
                android:onClick="@{infos.add}"
                android:text="Add"/>
            <Button
                android:id="@+id/removeItem"
                android:layout_width="match_parent"
                android:layout_height="wrap_content"
                android:layout_weight="1"
                android:onClick="@{infos.remove}"
                android:text="Remove"/>
        </LinearLayout>

        <TextView
            android:id="@+id/listHeading"
            android:layout_margin="10dp"
            android:gravity="center"
            android:text="@{heading.title}"
            android:layout_width="match_parent"
            android:layout_height="62dp"/>

        <android.support.v7.widget.RecyclerView
            android:layout_width="match_parent"
            android:layout_height="match_parent"
            android:scrollbars="vertical"
            bind:items="@{infos.list}"/>

    </LinearLayout>

</layout>

Implementation for bind:items is shown below,
    
@BindingAdapter("bind:items")
public  static void bindList(RecyclerView view, ObservableArrayList<AndroidInfo> list) {
    LinearLayoutManager layoutManager = new LinearLayoutManager(view.getContext());
    view.setLayoutManager(layoutManager);
    view.setAdapter(new AndroidInfoAdapter(list));
}

Adapter implementation

package com.example.databindingrecyclerview;

import android.databinding.DataBindingUtil;
import android.databinding.ObservableArrayList;
import android.databinding.ViewDataBinding;
import android.view.LayoutInflater;
import android.view.View;
import android.view.ViewGroup;
import android.support.v7.widget.RecyclerView;

import com.example.databindingrecyclerview.databinding.ListItemBinding;

public class AndroidInfoAdapter extends RecyclerView.Adapter<AndroidInfoAdapter.ViewHolder> {

    public class ViewHolder extends RecyclerView.ViewHolder {
        public ListItemBinding binder;

        public ViewHolder(View v) {
            super(v);
            binder = DataBindingUtil.bind(v);
        }
    }

    private ObservableArrayList<AndroidInfo> list;

    public AndroidInfoAdapter(ObservableArrayList<AndroidInfo> l) {
        list = l;
    }

    @Override
    public ViewHolder onCreateViewHolder(ViewGroup parent, int viewType) {
        View v = LayoutInflater.from(parent.getContext()).inflate(R.layout.list_item, parent, false);
        return new ViewHolder(v);
    }

    @Override
    public void onBindViewHolder(ViewHolder holder, int position) {
        final AndroidInfo info = list.get(position);
        holder.binder.setInfo(info);
        holder.binder.executePendingBindings();
    }

    @Override
    public int getItemCount() {
        return list.size();
    }

}

Binding the data

Binding the data to RecyclerView will be done in the onCreate of the activity, which is listed below,
@Override
protected void onCreate(Bundle savedInstanceState) {
    super.onCreate(savedInstanceState);

    MainBinding binding = DataBindingUtil.setContentView(this, R.layout.main);

    // Set the infos heading
    binding.setHeading(new ListHeading("List Heading"));

    // Set list items
    AndroidInfoList infos = new AndroidInfoList();
    binding.setInfos(infos);
}

Saturday 2 January 2016

Data binding in Android ListView

Let me assume that you have Android Studio 1.3 or later with gradle 1.5 or later.
For more information on how to setup your project with data binding please visit http://developer.android.com/tools/data-binding/guide.html

Gradle setup

Enable data binding in the build.gradle of your app, code snippet is shown below,
dataBinding {
    enabled = true
}

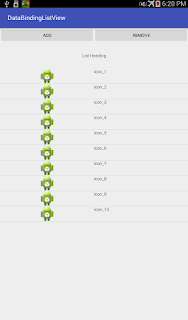
In this post we will have an example with a list of an ImageView and a TextView in each row. We will also have two buttons to add and remove items and a TextView as a heading for the ListView. The heading TextView's value, button event handler will be set using data binding.
A screenshot is attached below,


Binding a TextView text

Lets start by adding data binding support for the list view heading,which is displayed using a TextView.

The model class

The model class for storing the heading is a simple class with a String member variable to store the heading text and a constructor which takes the heading string as the argument.
package com.example.databindinglistview;

public class ListHeading {
    public String title;

    public  ListHeading(String h) {
        title = h;
    }
}

Resource 

Now lets update resource file to add support for data binding. Also lets rename the created resource file name to main.xml. As you can see we have declared a variable heading of type ListHeading and used it to set the text for the TextView. Also note that we have enclosed our layout  inside "layout" tag.
<layout xmlns:android="http://schemas.android.com/apk/res/android"
        xmlns:app="http://schemas.android.com/apk/res-auto">
    <data>
        <variable name="heading" type="com.example.databindinglistview.ListHeading"/>
    </data>

    <!-- Other components -->
    
    <textview android:gravity="center"
              android:id="@+id/listHeading"
              android:layout_height="62dp"
              android:layout_margin="10dp"
              android:layout_width="match_parent"
              android:text="@{heading.title}"/>

    <!-- Other components -->

</layout>

Binding the data

Now lets update the activity implementation so that we set the model instance to the view. The update onCreate method is shown below.
    @Override
    protected void onCreate(Bundle savedInstanceState) {
        super.onCreate(savedInstanceState);

        MainBinding binding = DataBindingUtil.setContentView(this, R.layout.main);

        // Set the heading
        binding.setHeading(new ListHeading("List Heading"));
 }


Instead of using setContentView we have used DataBindingUtil.setContentView with Activity context and the layout resource. This method returns a Binding implementation using which we can attach our model instance. Name of the class is derived from the layout file name, it will be name of the layout file suffixed with Binding.

Thats it, now we should be able to see "List Heading" as the text value for the TextView.

Binding model with ListView

Now lets add support for data binding support for ListView. In this example we will have ImageView and a TextView for each of the list view row.

Model

Our model class will have an integer to store the image resource and a string. This class will be used for individual row of the list view.

package com.example.databindinglistview;

public class AndroidInfo {
    public int iconResource; /* Resource id for the image */
    public String name;      /* Name */

    public AndroidInfo(int r, String n) {
        iconResource = r;
        name = n;
    }
}

For the list view we will have another class which stores a list of the above class.
package com.example.databindinglistview;

import android.databinding.ObservableArrayList;
import android.view.View;

public class AndroidInfoList {
    public ObservableArrayList<AndroidInfo> list = new ObservableArrayList<>();
    private int mTotalCount;

    public AndroidInfoList() {
        for (mTotalCount =1; mTotalCount <11; ++mTotalCount) {
            add(new AndroidInfo(android.R.drawable.sym_def_app_icon, "icon_" + (mTotalCount)));
        }
    }

    // Called on add button click
    public void add(View v) {
        list.add(new AndroidInfo(android.R.drawable.sym_def_app_icon, "icon_" + mTotalCount++));
    }

    // Called on remove button click
    public void remove(View v) {
        if (!list.isEmpty()) {
            list.remove(0);
        }
    }

    private void add(AndroidInfo info) {
        list.add(info);
    }
}

Layout file

Layout file for list view items. 
<?xml version="1.0" encoding="utf-8"?>

<layout
    xmlns:android="http://schemas.android.com/apk/res/android"
    xmlns:app="http://schemas.android.com/apk/res-auto">
    <data>
        <variable name="info" type="com.example.databindinglistview.AndroidInfo"/>
    </data>

    <LinearLayout
        android:orientation="horizontal"
        android:layout_width="match_parent"
        android:layout_height="wrap_content"
        android:weightSum="2">

        <ImageView
            android:layout_width="match_parent"
            android:layout_height="wrap_content"
            android:layout_weight="1"
            app:imageRes="@{info.iconResource}"/>

        <TextView
            android:layout_width="match_parent"
            android:layout_height="wrap_content"
            android:layout_weight="1"
            android:text="@{info.name}"/>

    </LinearLayout>
</layout>

Attribute app:imageRes will be used to set the image for ImageView from resource id. Implementation of which is shown below,
    @BindingAdapter("bind:imageRes")
    public  static void bindImage(ImageView view, int r) {
        view.setImageResource(r);
    }

List view layout entry,
        <ListView
            android:layout_width="match_parent"
            android:layout_height="match_parent"
            app:items="@{infos.list}"/>

Implementation for app:items
    @BindingAdapter("bind:items")
    public  static void bindList(ListView view, ObservableArrayList<androidinfo> list) {
        ListAdapter adapter = new ListAdapter(list);
        view.setAdapter(adapter);
    }


Here ListAdapter is a custom adapter. The adapter's getView method's implementation is listed below. DataBindingUtil.inflate will be used to inflate the layout resource for the listview items.
    @Override
    public View getView(int position, View convertView, ViewGroup parent) {
        if (inflater == null) {
            inflater = (LayoutInflater) parent.getContext()
                    .getSystemService(Context.LAYOUT_INFLATER_SERVICE);
        }

        ListItemBinding binding = DataBindingUtil.inflate(inflater, R.layout.list_item, parent, false);
        binding.setInfo(list.get(position));

        return binding.getRoot();
    }

Binding the Data

Modified onCreate of the activity implementation is listed below,
    @Override
    protected void onCreate(Bundle savedInstanceState) {
        super.onCreate(savedInstanceState);

        MainBinding binding = DataBindingUtil.setContentView(this, R.layout.main);

        // Set the heading
        binding.setHeading(new ListHeading("List Heading"));

        // Set list items
        infos = new AndroidInfoList();
        binding.setInfos(infos);
    }

Thats it, we have completed the data binding for ListView

Complete example can be found at https://github.com/trsquarelab/androidexamples/tree/master/DataBindingListView