


Let me assume that you have Android Studio 1.3 or later with gradle 1.5 or later.
For more information on how to setup your project with data binding please visit http://developer.android.com/tools/data-binding/guide.html
In this post we will have an example with a list of an ImageView and a TextView in each row. We will also have two buttons to add and remove items and a TextView as a heading for the ListView. The heading TextView's value, button event handler will be set using data binding.
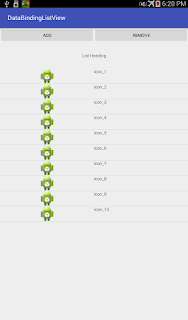
A screenshot is attached below,
Instead of using setContentView we have used DataBindingUtil.setContentView with Activity context and the layout resource. This method returns a Binding implementation using which we can attach our model instance. Name of the class is derived from the layout file name, it will be name of the layout file suffixed with Binding.
Thats it, now we should be able to see "List Heading" as the text value for the TextView.
For the list view we will have another class which stores a list of the above class.
For more information on how to setup your project with data binding please visit http://developer.android.com/tools/data-binding/guide.html
Gradle setup
Enable data binding in the build.gradle of your app, code snippet is shown below,dataBinding {
enabled = true
}
In this post we will have an example with a list of an ImageView and a TextView in each row. We will also have two buttons to add and remove items and a TextView as a heading for the ListView. The heading TextView's value, button event handler will be set using data binding.
A screenshot is attached below,

Binding a TextView text
Lets start by adding data binding support for the list view heading,which is displayed using a TextView.The model class
The model class for storing the heading is a simple class with a String member variable to store the heading text and a constructor which takes the heading string as the argument.package com.example.databindinglistview;
public class ListHeading {
public String title;
public ListHeading(String h) {
title = h;
}
}
Resource
Now lets update resource file to add support for data binding. Also lets rename the created resource file name to main.xml. As you can see we have declared a variable heading of type ListHeading and used it to set the text for the TextView. Also note that we have enclosed our layout inside "layout" tag.<layout xmlns:android="http://schemas.android.com/apk/res/android"
xmlns:app="http://schemas.android.com/apk/res-auto">
<data>
<variable name="heading" type="com.example.databindinglistview.ListHeading"/>
</data>
<!-- Other components -->
<textview android:gravity="center"
android:id="@+id/listHeading"
android:layout_height="62dp"
android:layout_margin="10dp"
android:layout_width="match_parent"
android:text="@{heading.title}"/>
<!-- Other components -->
</layout>
Binding the data
Now lets update the activity implementation so that we set the model instance to the view. The update onCreate method is shown below. @Override
protected void onCreate(Bundle savedInstanceState) {
super.onCreate(savedInstanceState);
MainBinding binding = DataBindingUtil.setContentView(this, R.layout.main);
// Set the heading
binding.setHeading(new ListHeading("List Heading"));
}
Instead of using setContentView we have used DataBindingUtil.setContentView with Activity context and the layout resource. This method returns a Binding implementation using which we can attach our model instance. Name of the class is derived from the layout file name, it will be name of the layout file suffixed with Binding.
Thats it, now we should be able to see "List Heading" as the text value for the TextView.
Binding model with ListView
Now lets add support for data binding support for ListView. In this example we will have ImageView and a TextView for each of the list view row.Model
Our model class will have an integer to store the image resource and a string. This class will be used for individual row of the list view.
package com.example.databindinglistview;

public class AndroidInfo {
    public int iconResource; /* Resource id for the image */
    public String name;      /* Name */

    public AndroidInfo(int r, String n) {
        iconResource = r;
        name = n;
    }
}
For the list view we will have another class which stores a list of the above class.
package com.example.databindinglistview;

import android.databinding.ObservableArrayList;
import android.view.View;

public class AndroidInfoList {
    public ObservableArrayList<AndroidInfo> list = new ObservableArrayList<>();
    private int mTotalCount;

    public AndroidInfoList() {
        for (mTotalCount =1; mTotalCount <11; ++mTotalCount) {
            add(new AndroidInfo(android.R.drawable.sym_def_app_icon, "icon_" + (mTotalCount)));
        }
    }

    // Called on add button click
    public void add(View v) {
        list.add(new AndroidInfo(android.R.drawable.sym_def_app_icon, "icon_" + mTotalCount++));
    }

    // Called on remove button click
    public void remove(View v) {
        if (!list.isEmpty()) {
            list.remove(0);
        }
    }

    private void add(AndroidInfo info) {
        list.add(info);
    }
}
Layout file
Layout file for list view items.
<?xml version="1.0" encoding="utf-8"?>

<layout
    xmlns:android="http://schemas.android.com/apk/res/android"
    xmlns:app="http://schemas.android.com/apk/res-auto">
    <data>
        <variable name="info" type="com.example.databindinglistview.AndroidInfo"/>
    </data>

    <LinearLayout
        android:orientation="horizontal"
        android:layout_width="match_parent"
        android:layout_height="wrap_content"
        android:weightSum="2">

        <ImageView
            android:layout_width="match_parent"
            android:layout_height="wrap_content"
            android:layout_weight="1"
            app:imageRes="@{info.iconResource}"/>

        <TextView
            android:layout_width="match_parent"
            android:layout_height="wrap_content"
            android:layout_weight="1"
            android:text="@{info.name}"/>

    </LinearLayout>
</layout>
Attribute app:imageRes will be used to set the image for ImageView from resource id. Implementation of which is shown below,
List view layout entry,
Implementation for app:items
Here ListAdapter is a custom adapter. The adapter's getView method's implementation is listed below. DataBindingUtil.inflate will be used to inflate the layout resource for the listview items.
Thats it, we have completed the data binding for ListView
Complete example can be found at https://github.com/trsquarelab/androidexamples/tree/master/DataBindingListView
    @BindingAdapter("bind:imageRes")
    public  static void bindImage(ImageView view, int r) {
        view.setImageResource(r);
    }
List view layout entry,
        <ListView
            android:layout_width="match_parent"
            android:layout_height="match_parent"
            app:items="@{infos.list}"/>
Implementation for app:items
    @BindingAdapter("bind:items")
    public  static void bindList(ListView view, ObservableArrayList<androidinfo> list) {
        ListAdapter adapter = new ListAdapter(list);
        view.setAdapter(adapter);
    }
Here ListAdapter is a custom adapter. The adapter's getView method's implementation is listed below. DataBindingUtil.inflate will be used to inflate the layout resource for the listview items.
    @Override
    public View getView(int position, View convertView, ViewGroup parent) {
        if (inflater == null) {
            inflater = (LayoutInflater) parent.getContext()
                    .getSystemService(Context.LAYOUT_INFLATER_SERVICE);
        }

        ListItemBinding binding = DataBindingUtil.inflate(inflater, R.layout.list_item, parent, false);
        binding.setInfo(list.get(position));

        return binding.getRoot();
    }
Binding the Data
Modified onCreate of the activity implementation is listed below,
    @Override
    protected void onCreate(Bundle savedInstanceState) {
        super.onCreate(savedInstanceState);

        MainBinding binding = DataBindingUtil.setContentView(this, R.layout.main);

        // Set the heading
        binding.setHeading(new ListHeading("List Heading"));

        // Set list items
        infos = new AndroidInfoList();
        binding.setInfos(infos);
    }
Complete example can be found at https://github.com/trsquarelab/androidexamples/tree/master/DataBindingListView
Great stuff!
ReplyDeleteHey, very nice article. It helped me a lot. But can you make an example with an ExpandableListView and how to add new children to a group with a button click?
ReplyDeleteHey, very nice article. It helped me a lot. But can you make an example with an ExpandableListView and how to add new children to a group with a button click?
ReplyDeleteI open your github but couldn't find calls to ListAdapter and ListBinder. Please can you explain how they function.
ReplyDeletebindList will be called when the corresponding layout is loaded. See the listview defined,
DeleteAttribute app:items is bound to method bindList
Your code is incorrect because you are not recycling item views properly. The item layout should be inflated only when convertView is null.
ReplyDeleteI suggest this code instead:
ListItemBinding binding;
if (convertView == null) {
binding = DataBindingUtil.inflate(inflater, R.layout.list_item, parent, false);
} else {
binding = DataBindingUtil.getBinding(convertView);
}
Then you also need to execute the binding immediately at the end of getView() so the ListView will be able to measure the views properly:
binding.executePendingBindings();
Thanks for the code! Yes, we could recycle. Or better consider RecyclerView
DeleteYour method is only applicable to a situation, that is, data is static and is ready before application's running. Am I right?
ReplyDeletethanks...
ReplyDeleteit took a lot of time to understand what was wrong in the code, but now i have the binding in the listview working.
thanks a lot.
Hi Buddie,
ReplyDeleteIn debt to you for making my learning on the Data binding in Android ListView area so hassle-free! I lay my faith on your writings.
I am writing a program in c which compute the longest common subsequences between two strings. But the problem is that when the input string length is>65
it does not give the output. I am doing the the program in DEV c++.
I have also tried in gcc compiler but in gcc compiler when the string length is>65 it gives some garbage value.
I need to execute the program when both the input string length is >65 as I need to compare its with other algorithm.
THANK YOU!! This saved my butt today, I’m immensely grateful.
Grazie,
Irene Hynes